The Pratt Truss originated from Caleb and Thomas Pratt (father and son) when they applied for a patent in 1844. Interestingly, their patent had less to do with design and more to do with a method for building trusses. After reading their patent application, my understanding is their patent was related to the type of connections of the truss members to the bridge frame as well as the inclusion of iron. Iron was becoming cheaper during that time, and offered improvements over all wood bridges.
Their construction method quickly became very popular and thus their name has been stuck to a particular truss design that we know today as the Pratt truss, although it is different than their patent.
You can read their original patent at the USPTO Website.
You can see that their example drawings do not look like the current “Pratt Truss”. To further complicate matters, the Pratt has many variations, most with their own unique name. For instance, the Baltimore, Pennsylvania, and the Parker are all based off the Pratt. However, today we have a commonly accepted truss design known as the Pratt, and it is very useful when building real and model bridges.
Let’s explore why.
How the forces are spread out
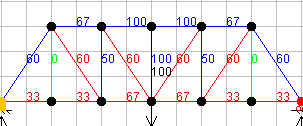
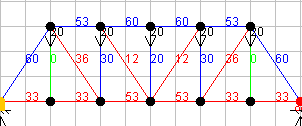
Here are two diagrams showing how the forces are spread out when the Pratt Truss is under a load. The first shows a localized load in the center of the bridge. The second shows the load being applied across the entire top of the bridge. In both cases the total load = 100.
Please note that the force diagrams do not change if the load is applied to the bottom of the bridge instead of the top.


These diagrams bring up several interesting things. Notice that there is no difference in force on the two end angle members. Also, there is little change on the bottom chord between the two pictures. However, there is drastic changes on the internal truss members.
The centered load dramatically increases the amount of force that is applied to the internal members of the bridge. In addition, the forces are increased on the top chord when the load is centered.
This seemingly insignificant change in how the bridge is loaded makes a big difference in how your model bridge will perform. If you have the ability to change and set how your bridge is loaded, I’d shoot for spreading the load across the entire span. This goes for any model bridge design, not just the Pratt Truss.
Is the Pratt Truss any good for model bridges?
The Pratt Truss design as pictured above is one of my favorites. I have used it often for my model bridges, including balsa, basswood, and popsicle sticks. It is easy to construct, and is a solid choice for a model bridge design.
What makes it so good, and gives it an advantage over the Howe truss, is how it spreads out the forces when under load. The longer, angled truss members are under tension. The shorter, vertical members are under compression. You’ll even notice a few vertical members have zero load.
Why does this matter?
Wood will eventually buckle (break) when under compression. The longer a piece of wood is, the sooner it will buckle when all other things remain the same.
To avoid buckling, you either have to increase the strength of the member by making it bigger, changing materials, or changing the shape of the member.
Or you can make it shorter. This is what the Pratt truss design does compared to the Howe truss.
The roots of the Pratt truss involved using iron, not wood for the angled members. It used wood for the vertical members. However, with most model bridges, you are just using wood. I think this does give the Pratt an advantage, but read my Best Bridge Design article more for information.
Better yet, build your own Pratt and Howe truss bridges and compare their strength on your own. I have kits and plans just for that purpose in my store.
Additional Resources
Pictures of Real Life Pratt Bridges
History of Truss Design
Article: Early Nineteenth Century Developments in Truss Design in Britain, France and the United States
Structure Mag: Pratt Truss


I am building a bridge model at 1:100 scale. I wanted to know how to scale the full size desing loads down for the model.
size to strength ratio is s:s^2
therefore if you’re bridge’s ratio is 1:100 then it’s strength capacity will be 1:10,000 in proportion to the original bridge
im making a pratt truss bridge, but i haveee NO idea if it can ave only 4 crosees?
I am not sure what you are asking.
yes but the bridge wont be as sturdy
I need to make a Truss bridge for my Physics class and i wanna use this design but i need to know, does the Height of the Bridge have any serious effects on the Pressure distribution for this design?
Yes. Changing the height of the bridge changes its aspect ratio which affects the forces on the top and bottom chords.
Would adding counterbraces to this model help it support more weight?
yes it will help support the weight !!!
Hi what will happen if I changed the angle of inclination to about 45 degrees? will it make the structure stronger? or weaker?
Yes this will make it far weaker in the sense that greater force will be transferred onto the members. Although reducing the height would increase torsional strength/sideways stability, a lower angle of inclination will have an adverse effect on the bridge. This can be seen using sin and cos ratios, where 45degrees increases the magnitude of the horizontal forces acting on the member.
am i write in saying that both bridges use steel and iron in modern construction of bridges. because the only disadvantage i found for the Howe truss was that is included wood and was heavier. my question is why is the pratt truss better other then the two reasons i mentioned above.
My daughter is building a bridge out of Bass Wood. Would wood glue or super glue jell work better.
Please check out our glue tips page:
https://www.garrettsbridges.com/wp-files/materials/gluetips/
Any chance you might have plans for a bridge that crosses a 300mm span , under 30grams in weight,with a 60mm. Load bearing
We do not have plans for a bridge with those specifications at this time.
Any chance you would be able to create a diagram showing compression and tension members in detail;
Alissa, what more detail are you looking for?
what are the blue en red en green lines meaning
blue means compression
Red means tensile strength
Green means it is a redundant truss
We used your blueprints to build a Warren, Pratt, and Long Howe truss bridge. We tested how much weight each bridge could hold using the hanging bucket method with sand and water. The Howe’s bridge held much more weight than the Pratt. The Howe broke under 54 kg while the Pratt held only 28 kg. This seems like too big of a difference considering how similar these bridges are. Also, I read that in the Pratt, the vertical members are under compression and therefore should be able to withstand more force. Do you have any input about these results?
Jessica, that is certainly an interesting difference. Were you able to tell what failed first on each bridge? In my experience, sometimes small differences in build quality or materials can make a big difference in how much a bridge can hold. If there is just one weak joint on the Pratt, that could have caused the early failure. Or perhaps there was a weak popsicle stick. This variances are one of the reasons a single test doesn’t provide enough information to make a conclusion about which design is better or not. More testing has to be done. But I am surprised by your results.
Yes, in the Pratt design, the vertical members are in compression. Because the vertical members are shorter than the slanted, and shorter pieces of wood hold more force in compression, theoretically the Pratt should do better when everything else is the same.
How did the Warren do compared to the others?
You said, “If you have the ability to change and set how your bridge is loaded, I’d shoot for spreading the load across the entire span. ”
Could you please explain how I could go about ‘spreading the load’ for my model bridge?
Also, if I were to add counterbraces, where/how would I do that?
Thanks!
Tara,
If you have the ability to use a larger loading block to spread the force evenly across the bridge, the bridge will hold more weight. That is what I meant. Otherwise, it is the job of your truss design to help spread the load throughout the bridge.
By counterbraces, do you mean adding to the truss design? Or do you mean lateral bracing?
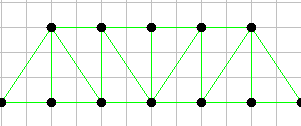
Hi. I have to build a toothpick bridge that is 11 inches long and I’m interested in the Pratt model. I see that there are isosceles triangles, but do you have any angle measurements? Are smaller or larger angles better in the triangles?
Also, do the variations of the Pratt design better in any way? I wouldn’t really mind building either type but I would just like to know if there are any benefits associated with the other Pratt designs. Thank you!
What angles/dimensions for the triangles would help to support a concentrated load? (There’ll be a small force plate used on the middle of the deck)
Let’s say the bridge is built out of iron. Is it possible to add another load on top? Say, adding car lanes to an existing Prat Truss railroad bridge, or a light rail track, but just putting them on top.
Whats the angle?
Inspecting a collision damaged truss bridge, you first need to know if the bent member is in compression or tension. If it’s being “pulled straight” it may have has less urgency that if its bent and compression. If at a lll unsure, I just imagine a plumb bob dangling at mid span and trace the load path back to the abutment or pier.
Trying to load rate our 100 year old multi span of steel trusses an Engineer did a finite element analysis and found that in the two camel back ones certain over-load conditions would cause members normally acting tension, to would go into compression, and we had to add bracing to achieve our desired rating. And we did.
More interestingly, he said that the original designer simply did not the calculating power to have ever gotten to where they could see it.
Not a bridge engineer, but have inspected (and even drilled into) some gorgeous old timber trusses. …Tapping the tension roads to see which one(s) might going out of tune. 😉 Sadly truckers with high loads are picking them off, one by one.
Very helpful in-sites in design. Thanks
What is the ideal number of trusses on a pratt truss?
that depends on how long the bridge is, the angle is typically 35/40 degrees per cross-brace. But it all depends on the length
What if it is a small Pratt Truss with a length of roughly 55 cm and a height of roughly 11 cm?