The Howe Truss was designed by William Howe in 1840. It used mostly wood in construction and was suitable for longer spans than the Pratt truss. Therefore, it became very popular and was considered one of the best designs for railroad bridges back in the day. Many Howe truss bridges exist in the North West United States, where wood is plentiful.
How the forces are spread out
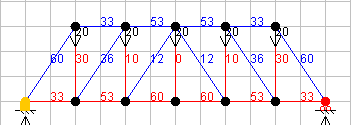
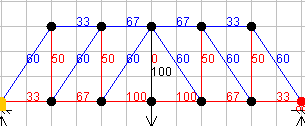
Here are two diagrams showing how the forces are spread out when the Howe Truss is under a load. The first shows the load being applied across the entire top of the bridge. The second shows a localized load in the center of the bridge. In both cases the total load = 100. Therefore, you can take the numbers as a percentage of the total load.


Similar to all the major truss designs (Pratt, Warren, K Truss, and Howe), when the load is centered on the bridge the forces are much greater on the internal truss members than if the load is spread out along the top of the bridge. The same principle applies if the load was coming from the bottom of the bridge. I use diagrams showing the load applied to the top of the bridge, because this is how I most often test my bridges. I load my bridges from the top.
When you are designing your bridge, I recommend that you use the Bridge Designer program from JHU and plug-in your design. Load the design in the same way your bridge will be loaded as specific in the rules and guidelines you were given to build your bridge.
Howe Truss in model bridges
One thing that you have to keep in mind when thinking about the common truss designs, including the Howe, is that they were designed a long time ago. They were designed when bridges needed to fill a specific role, and for the particular resources that people had available. For instance, the Howe truss design used a lot of wood as opposed to the Pratt which used more iron. This made the Howe popular earlier on when iron was expensive to produce.
The Howe truss used wooden beams for the diagonal members, which were in compression. It used iron (and later steel) for the vertical members, which were in tension. The Pratt truss was the opposite. Thus, because the diagonal members are longer, the Howe truss used less of the more expensive iron material. It made good use of the cheap wood which was readily available.
For model bridges, we typically only use wood. Our compression and tension members are both made out of wood. If you wanted to be fancy, you could use string or metal wire for the tension members. Nonetheless, in reality, the reasons why the Howe design became popular are not applicable to model builders. It remains a solid engineering model design, but I think I would prefer the Pratt truss over the Howe.


why only half of the weight is taken while calculating and drawing structure of truss at joints plse reply
I don’t understand this question. Could you please rephrase it?
why do pratt and howe trusses look the same???? 🙁
Keri, the Pratt and Howe trusses do look very similar. But there is a very fundamental difference, and if you look closely you can figure it out.
Love this website!!! Perfect for my assignment!! 🙂 <3
which would be better for a pasta bridge where the mass is directly below, howe or pratt? I’m guessing howe because the weight is more evenly distrubuted throughout the bridge.
epic
well it would be useful if there were some pictures !! of actual bridges..
Can I use some of these pictures for my science fair project?
Yes
if i were to build a bridge for a project in which the requirements entail balsa wood and a load attached to the bottom of the bridge so that the bridge is set between a space on 2 separate tables and a bucket hangs onto the bottom of the bridge, which bridge design would be able to hold more while weighing less? the pratt truss bridge or the howe trust bridge?
You are talking about the now common school project to build a bridge that is strongest. A key issue is to prevent the bridge from buckling, which is the usual failure mode. Bridges with a rectangular cross section almost always fail this way. So, think about building the bridge with a triangular cross section. Also, in most bridge designs the bottom chord is what rests on the tables. This puts the top chord in compression. If the triangular design is used, the top chord can be made twice as thick as in the rectangular design which will make it about four times less likely to buckle. I have seen one bridge sixteen inches long built with one box of toothpicks and and Elmer’s glue that supported over 20 pounds.
I have a question of the center load diagram…
You show a black line directly above the 100 load, and also a (0 in red) and (100 in black). Does this represent that the vertical member (which would be red) has zero force?? Is the black line with black 100 measure refering to the load being applied to the top horizontal row members also??? I ask because I’m trying to solve/study a problem with different and multiple loads acting at different joints within a Howe Truss structure… all solutions point to these vertical members as “zero-force” but i’m confused as to why if the load is being applied directly at that joint with vertical member… THANKS for great site!!
Adam
This website is so useful
😀 thank you
It really is, especially with the project we are doing at my school that has to do with bridges.
Mr. Boon, thank you for this wonderful resource on the howe truss bridge. I have a question. Where are the compression and tension forces distributed in the bridge? I couldn’t really see them in the diagram.
In the force diagrams above, the color red shows members in tension, and blue shows members in compression.
Can I make the Howe truss a little bigger in height?
No, this is not possible, the bridge will most definitely fail if the height is increased.
It is a very useful .
i would like to konw which website or software can draw the diagram of truss
A while back I built an HO scale Howe Truss Through bridge from a Campbell’s kit. I am now planning to scratch build a Howe Truss Deck bridge based on the plans for the Through bridge. My question concerns the vertical dimension of the upper and lower chords. On the Through bridge the lower chord has a larger dimension. From your stress diagrams I might guess the same would be true for a Deck bridge. But I am not sure.
Hi Peter,
I am not familiar with Campbell’s kits, but I imagine that they are probably replica kits. It seems that Model Train builders usually strive for high levels of realism and detail that comes from exact replicas. However, it seems odd to me for the bottom chord to be taller than the top chord. It might make sense if the top chord was a different shape, such as an L or T and wouldn’t need the vertical height. The top chord in both examples you give will be in compression, which means it will benefit more by being larger than the bottom chord. The bottom chord could be thinner and taller and still be strong. The benefit to this over a simple square shape is that now the joints have greater potential surface area (glue joints).
This really helped for science fair!
in the picture, it isn’t symmectrical, what do i do if mine isn’t symmectrical
Thank-you Garrett. You were very helpful, we will attempt to make this bridge. We would like to know is it possible to make the bridge longer, and how? Would we just put more of those intersection areas?
Hi Yale,
Yes, it certainly is possible to make the bridge longer by continuing the truss pattern with more sections.
can someone help me? I need to write an extra credit essay on Howe Bridges!!
I want the same figure for what is called ( Howe Pony ) Truss ?
What is the difference between Howe & Howe Pony Truss ?
A pony truss is a bridge that doesn’t have anything connecting the two sides (main trusses) above the roadbed. There is no lateral or portal bracing.
In order to use the Howe Truss for 30m span, what design criteria should i follow and what will be the spacing between the truss. Can i use the Howe Truss with steel?
Hello, what program do you use to create those simulators(?) that shows the distribution of force.
There’s a very similar program at https://ei.jhu.edu/truss-simulator/ which runs inside your web browser. Compared to Garrett’s diagrams here, the colours are the other way round — red for compression and blue for tension.
Thank you for sharing. This looks very interesting and I’ll have to check it out more.
Thanks Mungo! The approach used within the link reminds me of an old-fashioned Load-Transfer joint-modelling program we used at Boeing Everett 🙂
Thank you for all this lovely information on Warren, Howe, and Pratt trusses. In high school we are learning each and your cite has helped me complete my tasks and goals.
thank u for your infomation
The diagonal members are wrongly shown. They should been red instead of blue; they are in compression and not in tension
Sorry for the confusion. These diagrams were created with the now defunct JH Bridge Designer, which represented tension in red and compression in blue. However, it looks like I forgot to notate this.
Anyone else doing this for technology work?
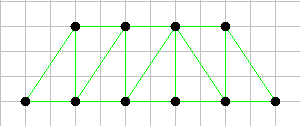
The pattern of diagonals is asymmetric for an odd number of bays, as shown in view at top of post with green members. It would be worthwhile to ask a bridge engineer if they would design a Howe Truss with odd number of bays. As an engineer myself I would set the size of each bay in order to produce an even number of bays and therefore the number of diagonal right and diagonal left members will be symmetric around the center point of the bridge.
I noticed this because my daughter’s class purchased the 21″ Howe Truss Kit, and most of the color photos in the instruction package have some diagonal members incorrectly shown — the scaled plan views are correct, with 4 bays diagonal left and 4 bays diagonal right. However the photos in instruction package show 5 bays diagonal right and only 3 diagonal left! Please review this 🙂 It’s bound do drive any OCD engineers who see the kit crazy.
Jen, thank you for pointing this error out and I will get it fixed with new photos. I also appreciate your design feedback about having even bays. I’m actually in process of updating all of the models with slight tweaks, and will take this into consideration for the 100 Stick Howe Truss model.
Thanks You For all shared