The type of joint you use on your bridge can drastically change its strength. There are three basic types of joints, the Lap Joint, End Joint, and Notched Joint. To increase the strength of an end or notched joint you can add a Gusset. Learn about each type of joint and when to use it on a model bridge in this article.
These pictures are not of glued joints, I simply laid sticks together. On a bridge, you want to make sure that the joints are clean and there are no gaps between the wood. Glue does not work well as a filler, the two pieces of wood should have no gaps.
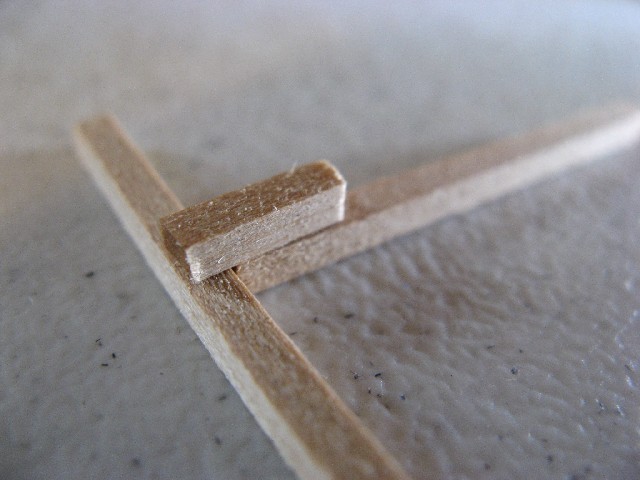
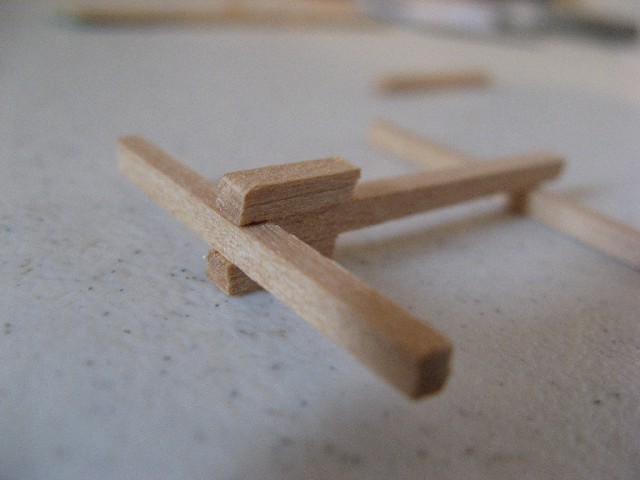
Lap Joint:
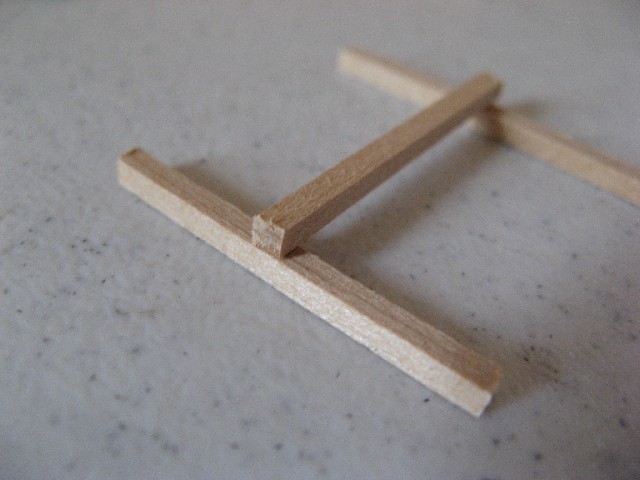
The lap joint is one of the strongest, and you should use it whenever you can. It helps members in compression to resist bending. The lap joint has a potential weakness, however. Depending on the type of glue you use, the joint is only as strong as the face of the wood. If your glue soaks into the wood then this will not be a problem. The face of Balsa wood is typically not strong, and tears easily. You can also help avoid tearing by making sure your lap joints have plenty of surface area for the glue.
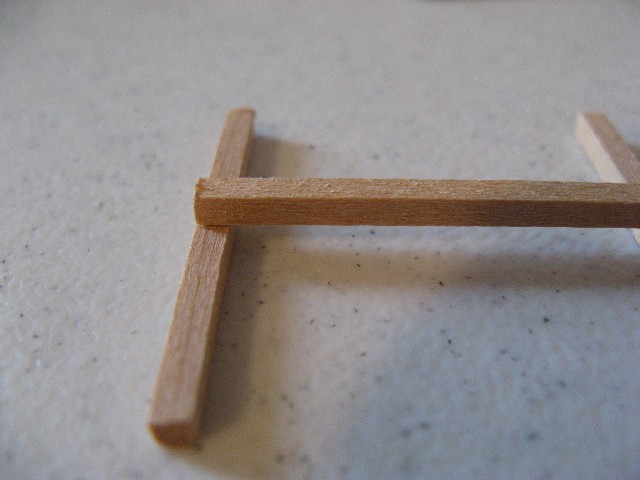
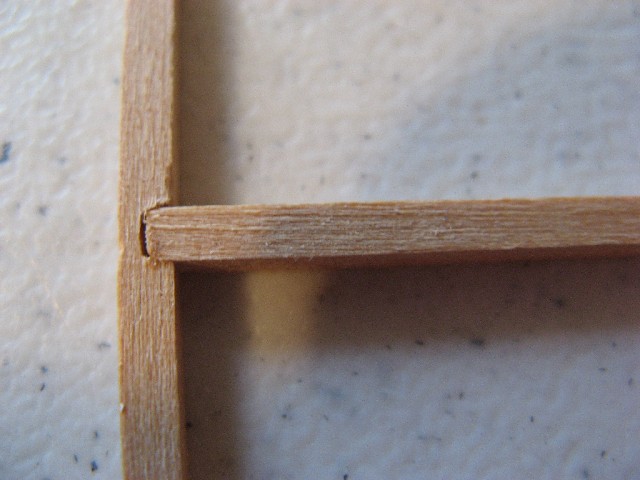
End/Butt Joint:

The end joint is not a very strong joint, especially for tension members. In tension, the two pieces of wood will just pull right away from each other. In compression, this joint will allow the piece to bend in a perfect arc. The lap joint holds the piece stiff, which does help it to hold more.
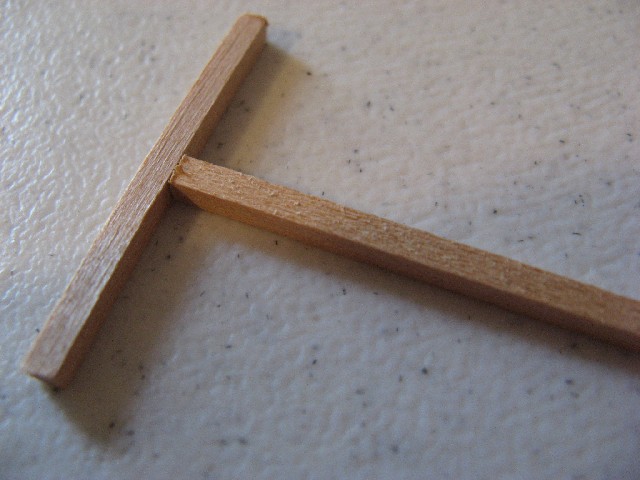
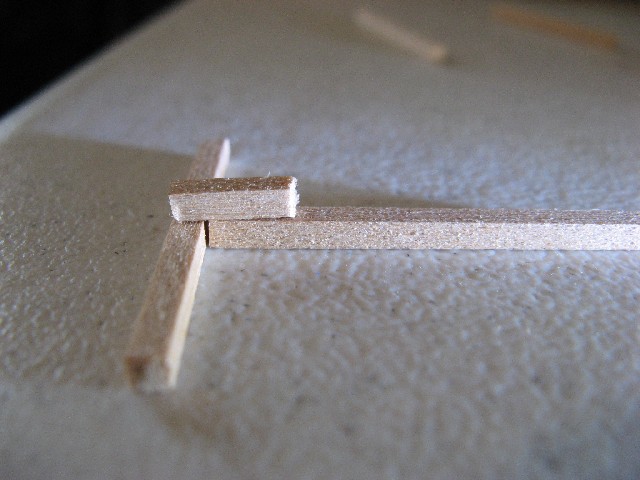
Notched Joint:
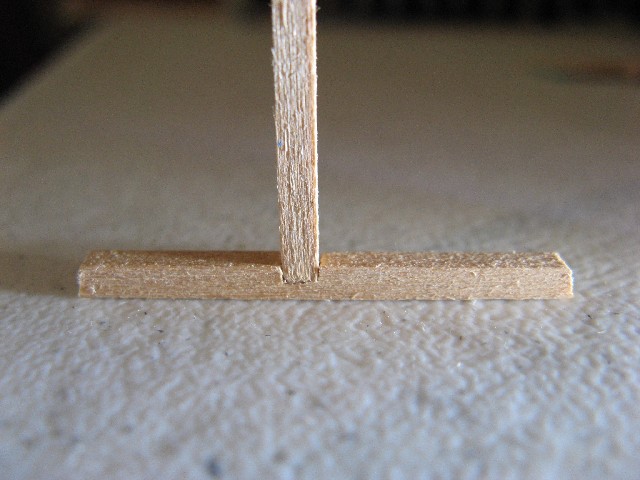
The notched joint gives more strength than the end joint, but less than the lap joint. And if the notch is a little too big, it creates a weakness in the notched member. It is also more difficult to build, which makes it not very common.
Gussets:
Sometimes it is impossible to avoid using an end joint on your bridge. But you can add a gusset to get all the benefits of a lap joint. In fact, you can make two gussets to create the strongest joint possible.
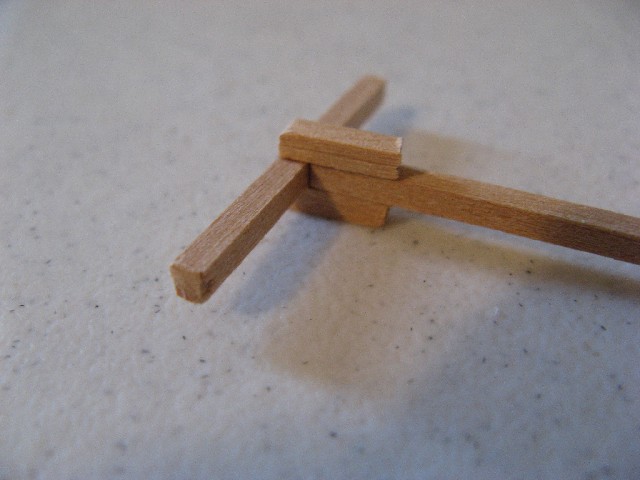
Typically gussets are thin pieces of wood, and not as thick as in these photos. Again, I was simply throwing together some scrap sticks of wood to get these pictures.
What is a Gusset?
First Timer, the article has been updated to show gussets.
Can you show a picture of a real Lap Joint because the diagram is a bit difficult to understand?
I’m a little confused too. This is good information, but I can’t say this gives me enough to go on. A picture (and a more detailed description) would be very nice.
I googled it but it doesn’t give me the specifics that I can usually find on this site.
well ya know that the lap joint is two overlapin peices. well think of a T but with the stick of the t to lay over the top and the overlap does not excede the edge of the top so you will have a T but with the stick over laping t.
First Timer, the article has been updated to show a real example of a lap joint.
Oh and I forgot to say—I don’t know whether my inferior glue (cheap glue gun glue, because it’s all I have) will work for a lap joint. There is no issue with craftsmanship or with time, but I don’t want to use a lap joint if, because of my glue, it will not be the strongest possible joint.
Also, the gusset image is confusing—it doesn’t really show me how I could construct a gusset if necessary.
Thanks for all of the information on this site, though, it’s been amazingly helpful.
Thanks a bunch, the photos help a lot.
I do have one more question, though. I want to put x-shaped supports on my bridge (it’s an elevated bridge, just for class but with all the SciOly requirements), but I don’t know how best to join them. I’ve heard of something, I think it’s called a half-lap joint, that I think might work best. You cut half of the wood off the part of the strip that will be the actual joint, and then connect the two pieces at those joint parts. There isn’t any part of the wood sticking out, and they are very connected, I think, as far as how the weight/force is distributed, which I figured would be good. But is there a better way to make an x?
Wow… I see you have updated the site so it is a little more understanding 🙂 This helps.. Thanks 😀
Howdy! I was wondering if there was a good joint for tension members. I noticed that most of the joints were recommended for compression members, so should I just use a lap or gusset (if needed) joint for tension members?
And what size wood do you suggest for lateral bracing?
Thanks a lot!
Thank you soo much for all your posts and infomation!! I’ll be competing at state finals in a few weeks, and your infomation has been the most useful I’ve found so far in my research! Thanks heaps! (again) 😀
this info could be mo0re helpful if you showed bridges that you have made with these joints and where you have used them other than that you have helped alot 🙂
Thanks for the idea, I will see about incorporating this.
I highly discourage using a notch joint. As one can see from the picture, it clearly degrades the integrity of the wood that’s been notched. Once a tension is put on the joint, the notched wood will break easily.
Salam Garret…those ideas really opens my mind, my vision wider on producing a better bridge for my statics subject…we in UNITEN are only allowed to use ice cream stick or could be said as popsicle..anyway do you have any link on designing a bridge..it will be great though
is there a special glue for balsa wood
Please see my Glue Tips page:
http://www.garrettsbridges.com/building/gluetips/
hey, is it possible to make a double gusset with a notched joint instead of an end joint? would that be stronger or weaker?
Eric, I’d say that if you are going to do a double gusset, then do not weaken your other members by cutting out a notch.
thanks. just wanted to be sure. this will help out my project
If a lap joint tears the face of balsawood, would it have similar effects on toothpicks? I’m making a toothpick bridge and need to know whether or not to use lap joints, end joints, or possibly gusset.
I haven’t done a lot with toothpick bridges, but it seems to me that lap joints would be the way to go. I’d think that you would want as much overlap in the joints as you can get because the surface area of toothpicks is not much to begin with. I also think that a toothpick would generally be of a higher density than Balsa. That would mean the face ripping off is less of an issue. Granted, I don’t think that toothpicks are high quality wood and there is probably a mixture of densities.
Thanks
I was wondering if i was to sandwich the legs between to two chords at the top and bottom, glue and pin my joints, would that make my bridge stronger than if i just did 1 cord and a lap conection? would the two chords at the top and bottom be over kill? I’m trying to beat the record (80 lbs hanging at center) in my strutures class in college. all the legs, cords and braceing have to be 3/16 x 1/2″ balsa. i’m thinking of going with the warren truss. we are allow to use pin, glue and gusset conections
Yes, the sandwich would be stronger than just 1 lap joint. Two chords at the top would not be overkill, but two chords at the bottom might be. This is because the top chord is in compression and the bottom chord is in tension.
I’d also consider making your top chord into a T shape as well. If you have your sandwich as described, glue another 3/16 x 1/2″ stick flat on top of the top chord. That will greatly increase its lateral strength.
Do you have a weight limit for your bridge? How is it going to be loaded?
Thank you for getting back to me. No, we don’t have a limit on the wieght, However the project must meet a 25% or less load capacity percentage. The bridge will be loaded from the center of the roadway deck with a hanging hook. wieghts will be added till it breaks. I like your idea of the t shape on top, however we’re only allowed to use 2 pieces of wood. I’m now thinking of using 2 pieces in a t shape for the top cord and sandwich the legs on the bottom cord.I want to hold a 100 lbs.(the record on this project is 80lbs) what do you think?
So you are only allowed to use two pieces of wood for the top chord. Hmm. That takes out the easy way to make your bridge stronger. I’d say to go ahead with your idea.
What is the sandwich? could you show the picture please?? thanks a lot
Just need to know, will this work with towers because I’m making one and I think that the pressure is distributed differnetly. Also is it possible for you to post a picture where a lap joint was actually incorporated into the structure.
How do you get the wood to bend?
Soak it in water for 24 hours and then bend it, keep it in place, and let it dry.
What did you mean when he said “Yes, the sandwich would be stronger than just 1 lap joint. Two chords at the top would not be overkill, but two chords at the bottom might be. This is because the top chord is in compression and the bottom chord is in tension.”
Haven’t seen any comments on a “double overlap”; i.e. sandwich one member between two. i’m guessing it’s roughly equivalent to a double gusset; perhaps a tad better… comments/experience?
Doug, you are right in your assumption. I actually use the double overlap joint a lot with popsicle stick bridges.
Hi, I really love your site. I have recently been given responsibilities for a balsa bridge-building team at my high school, & have been hitting the inet for a crash course. Your site is invaluable.
My team can only use 1/8″ X 1/8″ balsa, and the bridge is rated on efficiency. It has to span a 24″ area & can be up to 30″ long, 5″ tall.
We are looking at a deck Warren truss design, if I am using the terminology correctly. (playing around w/the Marine Corp software gave me the impression that you got more support for less structure than the pony or passthru designs)
Anyhow, onto the question: you are very pro lap joint, but intuitively it seems like for compression joints an end joint would be stronger, since you would literally be pressing the chords against the end joint. I would think the twisting of the truss as the bridge flexes would work counter to the strength of the lap joint, but it sounds as if I am incorrect. (I did see your note regarding viscosity of glue & making sure it seeps deeply into the balsa by cutting it w/ water.)
Secondly, something I read said that the shorter your truss members are, the stronger they are, & it is not a linear thing. (eg, a member half the length is more than twice as strong) If this is correct, then it sounds like a very short bridge w/ a lot of small members is superior to a taller bridge w/ longer trusses. If we have no min height requirement, am I thinking right here?
Also, I am now going to suggest the sandwich method for our top chord. We were contemplating stacking 2 pieces, but as they flex, I think we would be asking for trouble. Thanks again for this lovely site! (and sorry I am so wordy – I like to be thorough)
Steve, your comment is very refreshing. Very good questions.
Here’s my disclaimer. I might be wrong. I’ve got a lot of experience to base my thoughts on, but that doesn’t mean I’ve tested absolutely everything in every scenario.
1. I don’t like gluing to Balsa wood end grain, which is what you would have to do in a end joint. So you have a face grain joint vs end grain joint. Does a lap joint add extra force to the bridge as a whole? Maybe. A lap joint makes a compression member bend in a more complex shape than just an arc. I’ve seen it look more like a shallow S. This does make the compression member more stiff, which in turn would hold more force. However, it might add more torsion force to the entire bridge, I’m not sure if this would be a major factor. I’ve actually not looked for this before.
The last couple years I’ve been building exclusively with popsicle sticks, which require lap joints. End joints are not a good option, obviously because of the thin width of a popsicle stick.
2. Pieces of wood are stronger in compression the shorter they are. However, the shorter your truss is the more force is put on the top and bottom chords. Thus, a shorter bridges is not always better. You have to find a balance. I typically start with a 1/6 height to length ratio and work from there.
Balsa bridges are tricky because balsa wood is so variable. The best builders in the Science Olympiad competition that I knew would spend most of their time sorting and picking out the best wood, which involves knowing the density/stiffness of each stick.
Thanks for the comments. You have given me adequate “warm fuzzies” about the lap joint! 😀 I think over the summer I am going to work on a more formalized bridge building group at school so that we are already working on them BEFORE competitions arrive. I see this as something that experience can be a huge factor in.
Once we get this built, I will endeavor to send you a photo & let you know how it turned out. Thanks again for the great site & your enthusiasm for the topic.
UPDATE: Our humble bridge took 1st place at the competition! I am very excited. There were a total of about 10 bridges, but we were the most efficient. The rules were extremely restrictive, so we won w/ a modest efficiency of ~100. (our 0.1# bridge held ~10#)
I will look around to see where to u/l photos & give you a couple photos of our effort. Thanks again for this website & your advice.
Garrett,
Firstly, your site is amazing and chock full of very useful information. I appreciate the effort you put into helping educate others out there.
I was recently assigned a project to design a bridge only of straws. The shortest acceptable straw length is 2″, bridge width max is 1″, and minimum length is 14″. From what I’ve seen on your site, the bridge constructions, joints, etc, involve the use of wood.
My question is how the techniques you’ve illustrated can be translated to construction with straws. In other words, when using a material much more prone to buckling, would certain joint types, or trusses serve me better.
Again I appreciate the extensive effort you’ve put into your work, and look forward to hearing your option.
Best regards,
David
What other materials can you use besides straws? Tape? Glue? Paper clips?
I’d probably advise a Pratt truss, or any other truss design where you can keep the compression members short.
Hi Garrett!
For our physics class, we are required to make a balsa wood bridge. It’s a competition, and the bridge with the HIGHEST EFFICIENCY get a 100 as a test grade and the grades decrease as efficiency decreases. We have requirements: we may only use 15 pieces of balsa wood (2ft in length, 1/8 inch in width), and 2/3oz of wood glue. No other materials may be used. The bridge itself must also be between 10 and 12″ in length, be 2.25-3.23″ in width, and be less than 4″ high. We mus have a roadbed of 10-12″ in length, 2-3″ in width, and at least 2″ high. We can also have an optional underhang, 7″ or less in length, 2.25-3.25″ wide and less than .75″ in height. we are allowed to notch, miter, butt the wood and pieces on top of each other (not less than a 30* angle though). We are NOT allowed to split like a Y shape or laminate the wood with glue. We are allowed to use King Post trusses, lattice trusses, Pratt trusses, William Howe trusses, James Warren trusses, Squire Whipple trusses, Albert Fink trusses, and K-trusses. Any recommendations on how to scale what you had made down a few inches (but still have the same or close to the same efficiency) or make anything within these previously listed requirements with ample efficiency? Thanks so much! 🙂
Are you given wood to use or do you have to buy it on your own? The good news is that the shorter the bridge, the easier it is to get a high efficiency. I personally prefer the Pratt truss design.
We are given the wood.
How can I scale down the Fernbank Project-style bridge?
It would be hard for you to build the Fernbank Project bridge. What made that bridge highly efficient was the use of T and L Beams, which are not allowed if I understand your rules correctly. Balsa wood can be tricky, as it is very inconsistent. Don’t think that you have to use all the wood, as it sounds like you do not have a minimum weight to hold. The lighter your bridge, the less it has to support to get a high efficiency. Pick out the best wood.
I would recommend that you double your truss members by putting them on the inside as well as on the outside of your top and bottom chords.
Also, if it is allowed, you might want to consider mixing a little water with your wood glue. I know it sounds weird, but it can actually strengthen your joints by thinning the glue just a little bit. Thinner glue can penetrate into the wood better. I’ve heard that a 30% water 70% glue mix works well.
Make sure you have adequate lateral bracing and that your bridge is built so that it is perfectly vertical, and the sides are parallel to each other.
Balsa bridges tend to break for two reasons, a member in compression fails, or the joints pull out. Typically the face of balsa wood is not very strong, which is why you want your glue to go deep into the wood.
How do you know?
Thanks for this info. Now i can make a fantastic bridge for my technology project. Thanks again Garrett!!!
For one of my engineering classes, we are currently building a bridge. We are allowed to use only 15 sticks of 3/23 x 3/32 x 24 inch basswood. The bridge cannot be less than 14 inches long or more than 16 inches wide. The main challenge is that the center of the bridge must allow a ¾ inch rod to pass through the center top of the bridge extending downward to the bridge deck. In addition, the continuous interior width of the structure must allow a 2 inch by 2 inch by 18 in clearance test block to pass through without obstruction from end to end. This ¾ inch loading rod will press down on the bridge deck testing block.
I am thinking of designing a Pratt Truss. I have no experience in making bridges whatsoever, but I do love calculating joint member forces and etc. Any tips that can help me go in the right direction? Anything about designing the Pratt Truss and building it would be greatly appreciated.
(one addition note: the sticks can be laminated, with two or more pieces glued together with the wood grain parallel. However, lamination may not exceed two pieces.)
Hello fellow GSMST student.
I wonder how many of us are using this as a source.
Quite a few I believe.
I am doing a project in my class and this has helped me so much! I plan to come here whenever I have a project related to bridges!!!!
What type of bridge won for y’all? We have to do one with balsa wood this year and I’m trying not to fail
I’m writing a speech on our bridge that we did, and I was wondering why are double gussets the strongest bridge joints?
because the gussets hokd the stick to the other stick and keep it in place
This is not good i cant find a illustration and a double gusset
Hi, I have to make a popsicle stick bridge for my physics class, what is the strongest way to make a joint for an I-beam? We are not allowed to overlap the sticks. Thanks.
use gussets
do lap joints work on the sides of bridges?
/
Yes they do.
Hi friends, what type of joint is widely applied in bridge contruction?
Yo this is hectic, the bridges go crazy, i use won of does crazy notched joints and the big boy held. I mean WOW it really held. Thanyou so much gart for the information, My joints are stringer then every, 9/5 goes crazy, would build bridge again.
Congratulations :).